
관심쟁이 영호
[Thymeleaf] BootStrap 템플릿 적용, 레이아웃 및 템플릿으로 나누기 본문
오늘은 Thymeleaf에서 템플릿 조각, 레이아웃 나누기 기능을 공부해볼 예정이다.
목차
- 부트스트랩 템플릿 구하기
- 템플릿 조각 나누기
- 레이아웃 생성
- 템플릿 조각과 레이아웃이란?
먼저 적용을 하고, 무엇인지 알아보자.
부트스트랩 템플릿 구하기
부트스트랩에서 템플릿을 구해서 가져올 것이다. 먼저 아래의 링크로 가서 템플릿을 가져오자.
Free Bootstrap Themes, Templates, Snippets, and Guides
Start Bootstrap develops free to download, open source Bootstrap 5 themes, templates, and snippets and creates guides and tutorials to help you learn more about designing and developing with Bootstrap.
startbootstrap.com
내가 사용할 코드는 다음 페이지에 나와있는 템플릿이다.
https://startbootstrap.com/theme/freelancer
Freelancer - One Page Theme
A free one page Bootstrap portfolio theme for freelancers. All Start Bootstrap templates are free to download and open source.
startbootstrap.com
템플릿 조각 나누기
내가 나눌 코드는 Navigation, Footer, Config 이다. 조각 나누는 순서는 다음과 같다.
- fragment를 저장할 디렉터리를 생성
- 새로만든 디렉터리에 나눌 fragment 코드 분리
먼저 템플릿에 있는 navigation, footer, config 부분을 빼내어 새로 만들어보자!
(부분 생략하였다.)
navigation.html
<!doctype html>
<html lang="ko" xmlns:th="http://www.thymeleaf.org">

<body>
<nav th:fragment="navigation" class="navbar navbar-expand-lg bg-secondary text-uppercase fixed-top" id="mainNav">
    <!-- Navigation-->
</nav>
</body>
</html>
footer.html
<!doctype html>
<html lang="ko" xmlns:th="http://www.thymeleaf.org">

<body>
	<footer th:fragment="footer" class="footer text-center">
		<!-- Footer-->
	</footer>
</body>
</html>
config.html
<!doctype html>
<html lang="ko" xmlns:th="http://www.thymeleaf.org">
<head th:fragment="config">
    <meta charset="utf-8" />
    <meta name="viewport" content="width=device-width, initial-scale=1, shrink-to-fit=no" />
    <meta name="description" content="" />
    <meta name="author" content="" />
    <title>Freelancer - Start Bootstrap Theme</title>
    <!-- Favicon-->
    <link rel="icon" type="image/x-icon" href="assets/favicon.ico" />
    <!-- Font Awesome icons (free version)-->
    <script src="https://use.fontawesome.com/releases/v5.15.3/js/all.js" crossorigin="anonymous"></script>
    <!-- Google fonts-->
    <link href="https://fonts.googleapis.com/css?family=Montserrat:400,700" rel="stylesheet" type="text/css" />
    <link href="https://fonts.googleapis.com/css?family=Lato:400,700,400italic,700italic" rel="stylesheet" type="text/css" />
    <!-- Core theme CSS (includes Bootstrap)-->
    <link href="css/styles.css" rel="stylesheet" />
</head>

</html>
코드 설명:
- fragment : 해당 부분을 fragment로 지정한다는 코드이다. 다른 코드에서 해당 fragment name을 통해 인식한다.
레이아웃 생성
먼저 레이아웃을 생성하자.
template/layouts/base.html
<!DOCTYPE html>
	<html th:fragment="layout (title, content)" xmlns:th="http://www.thymeleaf.org">
		<head>
    		<title th:replace="${title}">레이아웃 타이틀</title>
		</head>
		<body>

			<div th:replace="~{fragment/navigation :: navigation}"></div>

			<section th:replace="${content}" class="page-section" id="contact">
    			<p>레이아웃 컨텐츠</p>
			</section>


			<div th:replace="~{fragment/footer :: footer}"></div>
			<div th:replace="~{fragment/copyright :: copyright}"></div>
			<div th:replace="~{fragment/config :: config}"></div>

			</div>

		</body>
	</html>
앞에서 생성한 fragment를 차례대로 불렀다.
코드 설명:
<div th:replace="~{fragment/navigation :: navigation}"></div>
- 앞에서 생성한 navigation fragment를 replace한다.
<section th:replace="${content}" class="page-section" id="contact">
    <p>레이아웃 컨텐츠</p>
</section>
레이아웃을 사용했을 때, 해당 부분은 customize 하도록 한다.
템플릿 조각과 레이아웃이란?
다음의 그림을 보자.
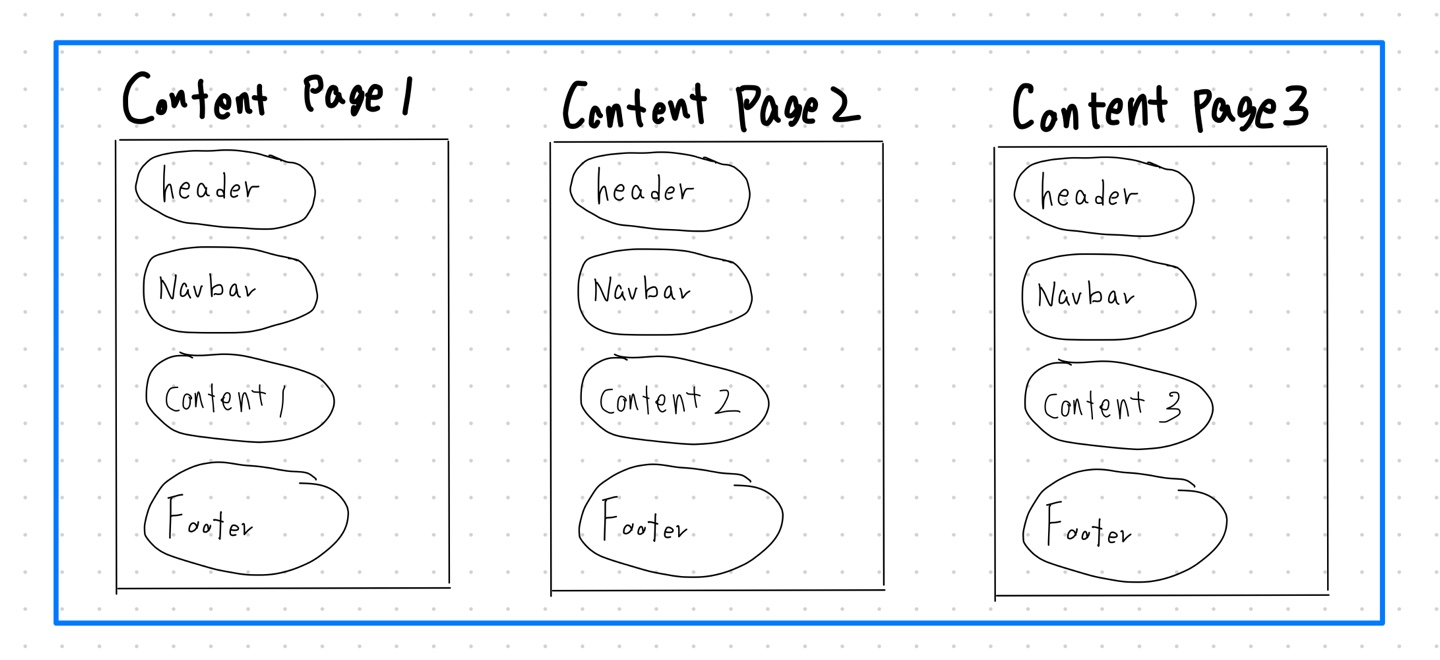
페이지 3개를 만든다고 가정하자.
위의 그림을 보면 header, navbar, footer는 세 페이지에 공통으로 똑같이 적용된다는 것을 알 수 있다.
각 코드에 같은 코드가 들어간다면 유지보수 중에 너무나도 힘들 가능성이 있다.
(※ 예를 들어, navbar에 한 글자를 바꾼다고하면 페이지 갯수만큼 수정을 해야한다.)
그래서 다음과 같이 fragment를 생성하여 가져다 쓸 수 있게 하였다.
다음 그림을 보자.

board라는 페이지를 만든다고 가정하자.
따로 header, navbar, footer를 생성해놓고 가져다 쓰는 것을 볼 수 있다.
(※ 이 경우, 따로 생성해놓은 navbar만 고쳐주면 해당 navbar를 쓰는 모든 페이지가 수정될 것이다.)
개발자는 content 내용만 각각 페이지에 다르게 설정해주면 코드중복없이(템플릿을 가져다 쓰는 코드는 중복될 수 있다.) 페이지를 생성할 수 있다.
그럼 레이아웃은 무엇인가?
다음 그림을 보면서 이해하자
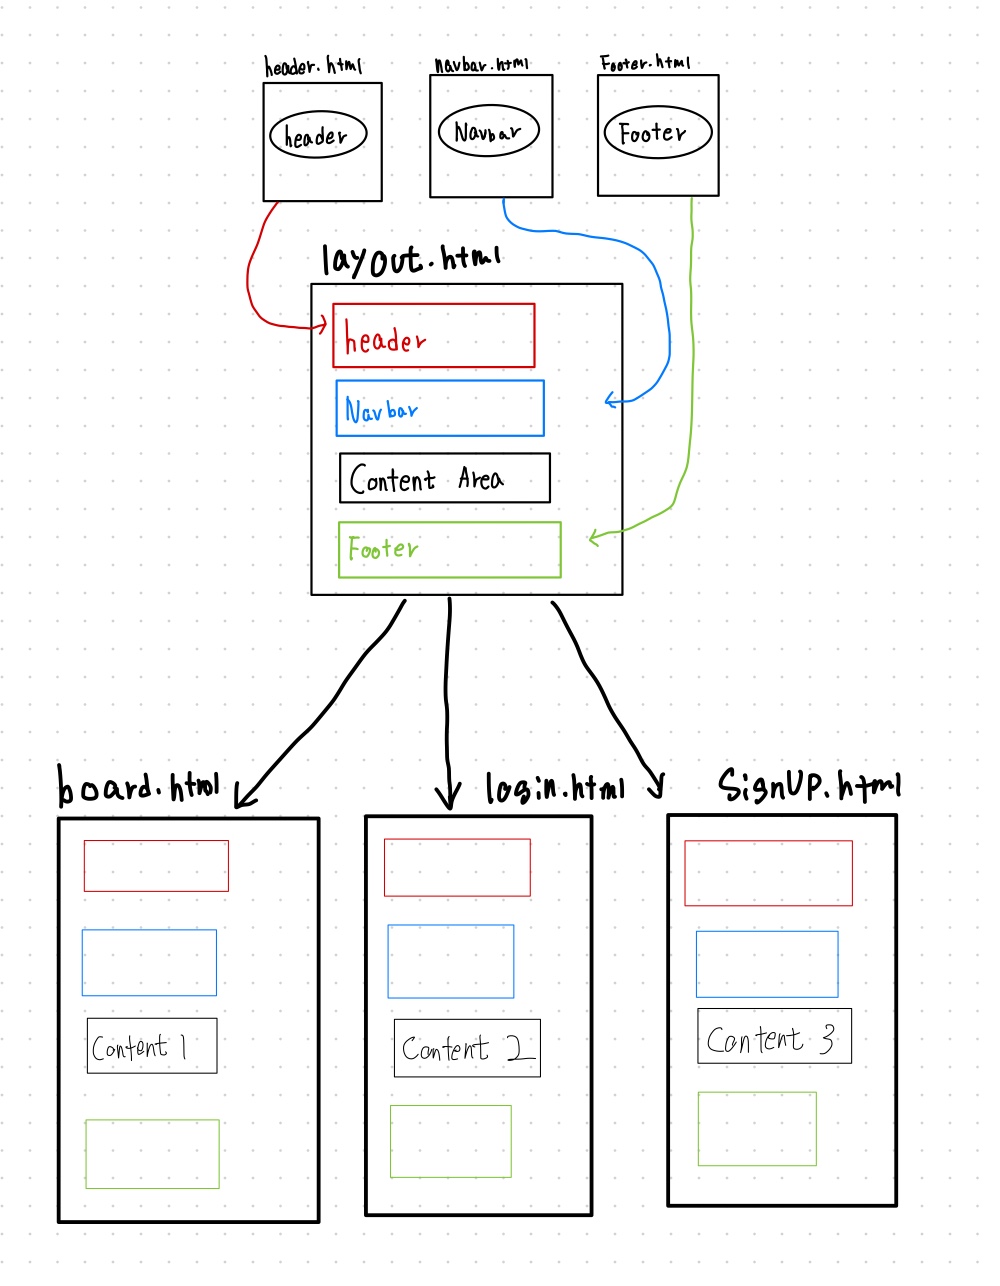
각 템플릿의 위치가 똑같고 페이지가 대부분 비슷할 경우, 모범 html(레이아웃)을 만들고 그것만 가져다 쓰면 된다.
(※ 레이아웃에서 각 페이지마다 customize할 부분을 정해두어야 한다.)
이해가 쉽쥬!?
'Front-End > Thymeleaf' 카테고리의 다른 글
| [Thymeleaf] 입력 폼 처리 (0) | 2021.08.03 |
|---|